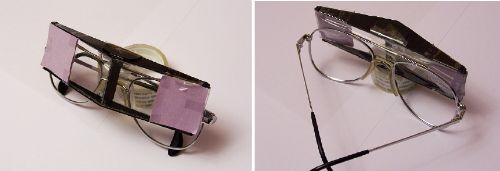
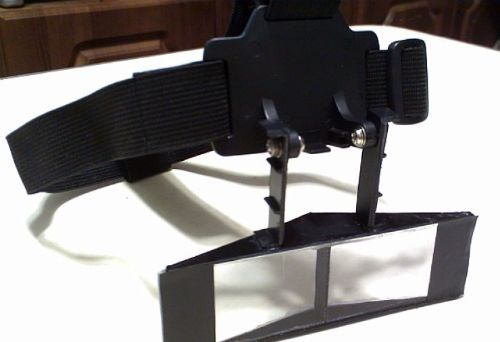
For 150 years people have been free-viewing stereoscopic photos (and more recently videos) in a side by side cross-eyed format, where the left view is positioned to the right of the right view. You’re force to cross your eyes like an optical contortionist. For eyeballs with less agility, this can become painful. By using prisms in front of each eye, the eye strain is eliminated. Here’s a truly unique DIY method for building such a viewer on the cheap.
Introduction
Fluid-based prismatic stereoscopic goggles it’s full-color no-ghosting stereoscopic goggles tech, that everyone can make in a matter of several hours with use of materials for total cost about $1. No anaglyph or similar principles that can ruin colors, those prismatic goggles are working in other way.
The idea is simple – you know about cross-eyed method of viewing stereo-pictures; the idea of these goggles is to make optical device to view cross-eyed content from monitor, with which you don’t need to strain your eyes, bingo!
It’s working flawlessly on any monitor, even on printed-out pictures.
Construction
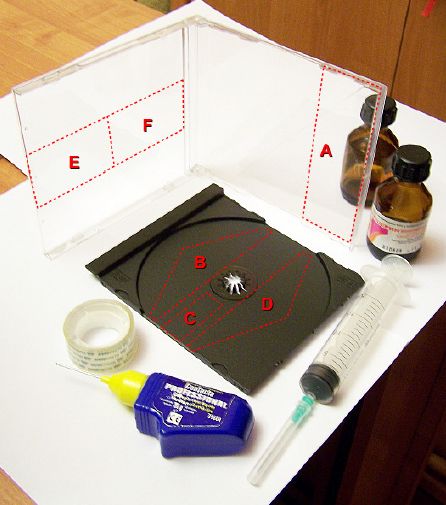
To make fluid-based prismatic stereoscopic goggles you will need following materials:
- Transparent CD box
- Plastic glue
- 50g of Glycerol (can be found in drugstore) [we used 85% consistency and no flavor]
If you can’t find glycerol you can use distilled water, but glycerol has a bigger IOR rate and will give better characteristic to goggles.
You will also require following tools:
- centimeter line (metal one is preferable)
- knife (to cut plastic, office knife for example)
- file or emery board (will be used to smoothen corners)
- syringe (to fill prism with liquid)
Let’s Start!
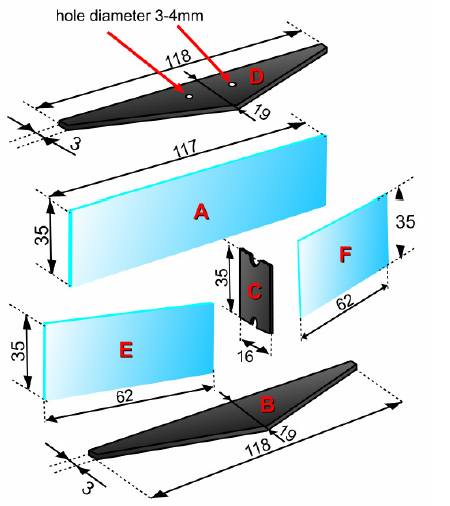
From bottom-part of CD-box cut detail “A” (you will have needed size for detail automatically if you will cut from side-to-side), you can cut only a few times, after that plastic can be broken by cut-lines.
Details: “B”, “C”, ‘D” must be made from black plastic of CD-box. Cut two notches in “C” membrane (on the top, and on the bottom) – this must be made to allow liquid and air move from one part of prism to another. Rub glance side of membrane “C” with emery, to make it matt. You will need to glue-in “B” & “D” details by matt side inside prism to minimize mirroring effect.
After you cut all the details – to fit ideally trim them, if needed. You can trim with a file or use your emery board.
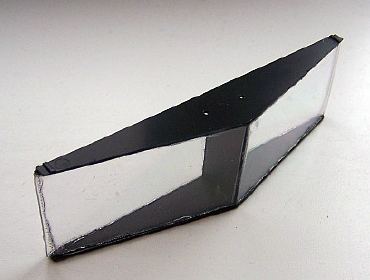
When all details are ready, we can glue them together, lets start by glue part “C” to the middle of part “A”, then glue parts “E” & “F”, after this while glue is not dry yet you can fit these details together ideally and glue detail “B” to the bottom.
Give it to dry out totally, don’t let any holes appear, you can mix plastic-chips with glue, to make it denser, and fill all contours with such mix to exclude holes.
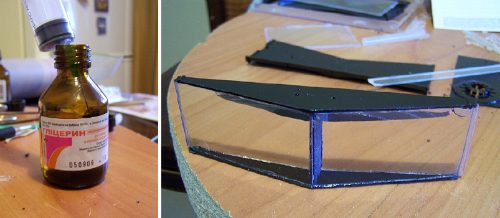
When construction dries, you can test it by filling it with cold boiled water. If you see fluid leakage – dry prism, and glue that holes again. After you will be sure that your construction is safe to fill with liquid – glue box top (detail “D”). Be sure to make small holes 3-4 mm diameter in “D” as it shown on picture, before glue it. After glue dry we can fill prism with liquid.
As a liquid for our prism, it’s better to use glycerol (it has better refraction capabilities than water), but if you don’t have glycerol you can use distilled water. To properly fill your prism with glycerol – use syringe, it’s very careful and slow process because glycerol is very dense, but little by little you can fill the prism, try not to make air bubbles, and fill your prism to maximum (some bubbles of air is ok). After you filled the prism, dry out holes and close them with sticky tape, or glue them with another plastic part.
Shutters & Mounting
To improve stereo-image quality, remove left and right mirror images (so only stereoscopic picture will remain visible), you can make shutters (from paper, or not-transparent tape), and fix them on prism with sticky tape as it shown on picture. By the way you can look on this prism from both sides. Size of shutters depends of your monitor, generally – 31 x 35 mm is ok.
How To Use
Just bring prism to your eyes and look at some cross-eyed format stereoscopic content, try to vary different distances to your monitor and choose the best that suited for you.
Other Materials
These goggles also can be made from organic glass (make certain it is shatter-proof), but it will require more sophisticated instruments and techniques! You can vary the size of prisms, but be sure to make 18 degree angle between its front and back surfaces.
Content
Any cross-eyed stereo pair can be viewed with these goggles.
Here’s some interesting links for pictures:
Good collection of stereoscopic cross-eyed pairs can be found here: https://www.mtbs3d.com/gallery/
Movies:
Various short movies in side-by-side format can be found here: https://www.3dtv.at/Movies/Index_en.aspx
Many stereoscopic movies can be found on Youtube, search “stereo pair” or view this link: https://www.youtube.com/results?search_query=stereo+pair&search_type=&aq=f
Don’t forget to select cross-eyed mode in Youtube options.
Games:
If you have Queke3 by ID Software, you can download this stereoscopic mod to play with stereo-prism: https://games.mirrors.tds.net/pub/planetquake3/modifications/stereoquake.zip
Just unpack it into “baseq3” directory of Quake3 and run the game!
Example of how it looked can be found here: https://www.youtube.com/watch?v=tXvirxRK-Ww
Avatar game can output picture in cross-eyed stereo-pair, to make this: turn on stereo and select “side-by-side” output, also turn on “swap-eyes” option. You can download Avatar game demo here: https://www.gamershell.com/download_53202.shtml
Stereoscopic drivers:
There are two stereoscopic drivers on the market that can output cross-eyed stereo-pairs from DirectX games, they both payware, work in different ways, but both have trial versions, so you can try and choose which driver you liked most.
IZ3D driver: https://www.iz3d.com/driver
DDD TriDef Ignition driver: https://www.tridef.com/ignition/


